- Magazine
- #readityourway
- Weekly Stories
- #shareyourstory
-
Adventure
- Abroad Travelling
- Africa Travelling
- Events
- Expos & Shows
- Festivals
- Fishing
- Free Diving
- Gliding
- Horse Riding
- Inspiring People
- Islands Travelling
- Kite/Windsurfing
- Motorbiking
- Motorised Water Sports
- Mountaineering
- Mountain Biking
- Off-road 4x4
- Off-road Motorbiking
- Paddling
- Performance Driving
- Photography
- Rock Climbing
- Rollerblading
- Sailing
- Scuba Diving
- Skateboarding
- Skydiving
- Snowboarding & Skiing
- Surfing
- Swimming
- Trail Running
- Wakeboarding
- Waveski Surfing
-
Sport
- Adventure Racing
- Fishing
- Free Diving
- Gliding
- Health & Fitness
- Horse Riding
- Inspiring People
- Kite/Windsurfing
- MMA
- Motorbiking
- Mountain Biking
- Multi-sport
- Off-road 4x4
- Off-road Motorbiking
- Paddling
- Performance Driving
- Photography
- Road Cycling
- Road Running
- Rock Climbing
- Rollerblading
- Sailing
- Scuba Diving
- Skateboarding
- Skydiving
- Snowboarding & Skiing
- Surfing
- Swimming
- Rugby
- Trail Running
- Triathlon
- Wakeboarding
- Waveski Surfing
- Lifestyle
- Calendar
Basics, Bring Home the Bacon
Words: Deon Breytenbach | Photos: Helena Pienaar & Deon Breytenbach
Topic:
Paddling
We've made it to January 2013, which means the world obviously didn’t stop spinning and the rivers are still flowing downhill, brilliant! This year, my articles will focus on essential river running and freestyle skills, starting with the basics. Freestyle skills are more than just cool tricks. They help you to fine tune things like edge control and make you comfortable in retentive river features. Getting the basics right could mean the difference between escaping from a big, nasty hole with a smile on your face or taking a long, lonely and sometimes rather traumatic swim.
Rolling your kayak
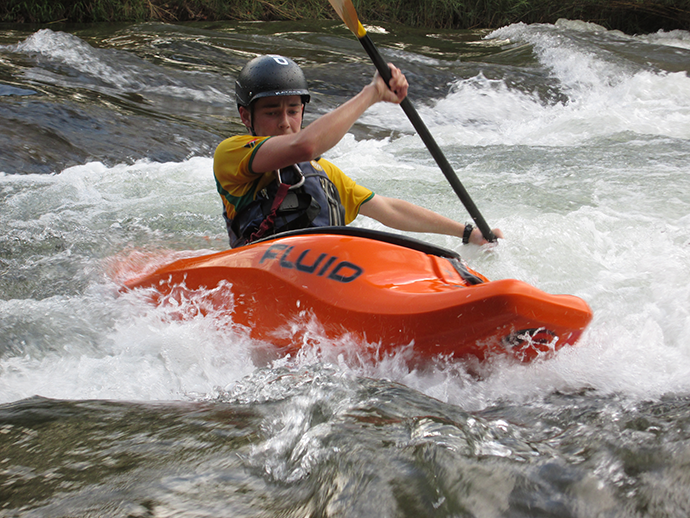
So to get things started, let’s take a look at the basic principles of rolling your kayak. It is true that in the beginning rolling is the most difficult aspect of kayaking, as it requires quite a bit of flexibility and total commitment. But once you get the hang of it, it's super easy and becomes natural. The most important thing to remember is that a successful roll needs a strong hip flick. Practise this by putting your hands on the bow of your buddy's kayak or on the surface of some other stable-ish object, then put your head on your hands and tip your kayak over as far as possible. Then use your hips to roll your kayak back upright - all without moving your head off your hands. This position will help you to isolate the movement to just your hips and core, and it also gets you into the habit of keeping your head down.
The second crucial step is your initial set-up. For most of the different rolls out there, except the back-deck roll, your initial set-up is the same. You want to tuck forward as far as possible (think nose on splash deck), as this will get your paddle close to the surface and give you the most support from your sweeping paddle blade, to get the maximum power from your now well-practised hip flick. Quite often in the early stages, kayakers try to roll as quickly as possible with a bad set-up, and end up staying upside down. Before attempting your first roll, take the time to set-up properly and then commit to it once you get going.
The last key issue, and often the toughest to perfect, is that your head must be the last thing to come up, and even when you are up you must keep it down as if looking into the water. This will seem very counter intuitive, as your mind is aware of the fact that there is no oxygen available for you in the water and therefore wants your head out pronto, but it's necessary. The reason is that when you hip flick, you are using your core muscles to push on the one side and pull on the other. Now, if you throw your head up to get it out of the water, the muscles that are supposed to be pushing pull and the pullers push, so you end up upside down. I know this is all rather confusing, especially in text, and even more so when you actually practise these moves because you are generally upside down and underwater. But don't worry because there are also various books and online video guides to help you sort out your roll. If you still battle, then get assistance from an experienced, local paddler or sign up for a rolling clinic with one of the training centres, such as Kalahari Adventure Centre, Gravity.co.za, Blyde Adventure Camp, Whitewater Training or Itchy Feet SA.
Flat spins
Now let's look at what you need to keep in mind for flat spins (a 180° or 360° horizontal rotation). This is definitely something all kayakers should be able to do, as you may just end up in some or other retentive river feature and being able to change the direction you are looking in by spinning around will make your life a lot easier in an unexpected situation. Here's the three key points.
The first is edge control. You can control your edges by lifting one of the sides of your kayak with your hips and knees, and using your core muscles. Don't lean your body to the side, rather keep your body over the centre line of your kayak and then lift the edge as described. Always lift the upstream edge, but only enough so that the water can flow beneath your kayak. Each situation you may find yourself in will require a different amount of edge, but the idea is the same. Just remember that if you lift the upstream edge too much, the downstream edge will dig deep and this will either make you bounce around with little control or get pushed downstream. However, lifting too little will result in a solid 'window shade' and a very quick and possibly violent upstream flip. Give just enough and the ride will be quite smooth and controllable. It all comes down to practise, practise, practise!
The second is the role your paddle plays in this whole process. Your paddle does two things: firstly it gives support as a brace, and secondly it provides the power to initiate the spin. Only use your paddle on the downstream side of your kayak. What you need to do with your paddle is imagine that your right hand is downstream, so your left edge is up. Now you have your blade in the water and in line with your hips. When you are ready to spin, do a strong reverse sweep stroke from your hips to your toes, and this will push your bow downstream and stern upstream.
The third and crucial part is timing when to swop your edges while the kayak rotates. The trick to use here is very simple, but like everything else takes practise. Imagine that 12h00 is directly upstream and 06h00 is directly downstream, so whenever you are in a hole or on a wave, you want to be looking at 12h00. Now when you do your reverse sweep to rotate your bow downstream, keep looking at 12h00 (over your left shoulder), and once the stern of your kayak comes into view turn your head to look over your right hand shoulder, at the same 12h00 spot you were looking at, and swop edges. At the same instant, take your paddle out of the water, bring it around, drop it at your toes (on your left-hand side now) and do a forward sweep. This will cause the kayak to spin around, and you'll now have your left blade on the downstream side and your right edge up.
I know this is hard to follow, so for frame by frame pictures and descriptions that cover everything mentioned above, check out my flash new blog. You will also find links to various online resources and a list of all the white-water events in the country, as well as everything you need to know about each one.
dinFO:
For more information and tutorials, visit Deon's blog: www.doitnow.co.za/blogs/deon-breytenbach
Issue:
Issue 21 Jan '13
Contributor:
Deon Breytenbach
Related content
|
|
|
|
|
|
|
|
|
|

