- Magazine
- #readityourway
- Weekly Stories
- #shareyourstory
-
Adventure
- Abroad Travelling
- Africa Travelling
- Events
- Expos & Shows
- Festivals
- Fishing
- Free Diving
- Gliding
- Horse Riding
- Inspiring People
- Islands Travelling
- Kite/Windsurfing
- Motorbiking
- Motorised Water Sports
- Mountaineering
- Mountain Biking
- Off-road 4x4
- Off-road Motorbiking
- Paddling
- Performance Driving
- Photography
- Rock Climbing
- Rollerblading
- Sailing
- Scuba Diving
- Skateboarding
- Skydiving
- Snowboarding & Skiing
- Surfing
- Swimming
- Trail Running
- Wakeboarding
- Waveski Surfing
-
Sport
- Adventure Racing
- Fishing
- Free Diving
- Gliding
- Health & Fitness
- Horse Riding
- Inspiring People
- Kite/Windsurfing
- MMA
- Motorbiking
- Mountain Biking
- Multi-sport
- Off-road 4x4
- Off-road Motorbiking
- Paddling
- Performance Driving
- Photography
- Road Cycling
- Road Running
- Rock Climbing
- Rollerblading
- Sailing
- Scuba Diving
- Skateboarding
- Skydiving
- Snowboarding & Skiing
- Surfing
- Swimming
- Rugby
- Trail Running
- Triathlon
- Wakeboarding
- Waveski Surfing
- Lifestyle
- Calendar
Basics - Styling Draw Strokes and Cartwheels
Deon Breytenbach | Photos: Sam Dold & Ruby Strauss | Blog: www.doitnow.co.za/blogs/deon-breytenbach
Topic:
Paddling
When kayaking, as with many other adventure sports, you reach a point rather quickly where power hits a limit and the only way to keep improving is by combining power with proper technique, especially in freestyle.
Draw stroke
So let’s first look at the draw stroke, also known as a rudder stroke, and its variations. The idea behind a draw stroke is that it allows you to change direction whilst maintaining momentum. Imagine you are paddling towards the top of Thrombosis Falls and you punch the wave on the entry, but it pushes you to the right. If you can’t draw properly, your choice to correct your line over the lip of this 10 m waterfall would be an attempt at a right sweep and hard forward stroke. The most likely scenario though, is that you sweep on the right, turn sideways, fall off the lip of the waterfall in the corner, onto your head and hopefully make it out safely after your mates rescue you. Now if you could draw, you would draw on your left, move to the side still facing downstream, wait for the lip and boof off, while smiling at your friend taking the photo.
The basic key elements needed to get your draw stroke going are torso rotation, stroke placement and blade control, and the best way to practice this technique is on flat water.
Torso rotation and stroke placement: Using a right-hand draw as an example, you need to rotate your torso in the direction of your active blade. Hold your paddle in your right hand only, place your blade in the water between your knees and hip, the more in line with your hip the better, at about a blade’s length away from the side of your kayak. Your paddle shaft must be as vertical as possible. Now comes the tricky part. You must, without tilting your paddle shaft, rotate your torso as far as you can towards your paddle and bring your left hand to its grip on the paddle. The more you rotate your torso, the easier and more comfortable this becomes.
Blade control: Now try to slice your blade to your bow and stern; it should slice like a knife through the water. This is where blade control comes in and is the true key to a good draw or falling over onto your paddle.
The power face of your blade is facing your kayak and if you turn your wrist slightly clockwise, you open the face of the blade. But if you keep your blade in the same place you planted the stroke, and you have some forward momentum, your kayak should stay in a straight line, moving slightly to the right. With your blade face still slightly open, slide your blade towards the bow of your kayak and this will turn the bow towards the blade that’s in the water.
Draw stroke routine: Here’s a little routine you can practise. Paddle forward in a straight line, plant your blade just in front of your hips and open the face of the blade. Feel how the kayak moves a little towards the side that your blade is in. Now do another forward stroke or two and plant the paddle in the same spot, with the blade face open, and slide the blade towards your bow. Feel how the kayak now wants to turn rather than drift across.
Remember, the above description is for your right hand. If you are doing this on your left-hand side, then you need to twist your wrist slightly anti-clockwise to open it up. The blade in line with your hips is a neutral draw, so by sliding the blade forward it becomes a bow draw. Using draw strokes saves a lot of energy and just makes paddling so much easier, more fluid and fun!
I would love to explain all the finer key elements and variations further, but this description should, at least, get you started. For all the extras and how to really get the most out of your different draw strokes by using the currents and flows in the river, check out my blog spot.
Cartwheels
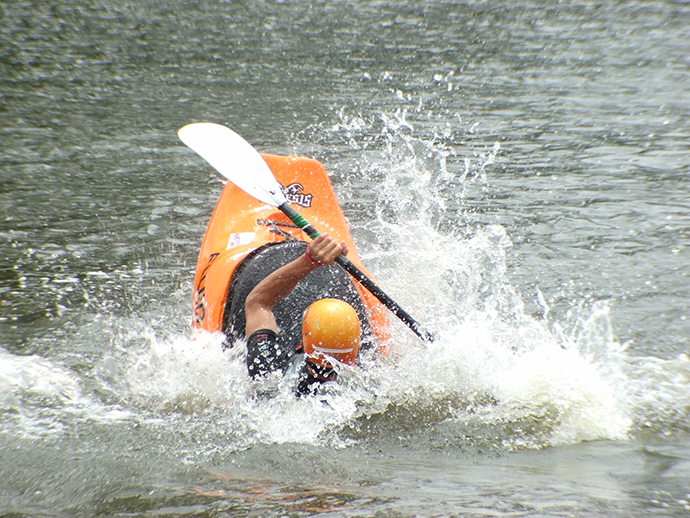
In the February issue I took you through spins and blunts, so you should have the hang of rotating your kayak on a horizontal plane. Now it’s time to take it up a notch and get vertical with cartwheels. The awesome thing about cartwheels is that you can practise them on flat water, and with modern freestyle designs, like the Fluid Dope, things have become so much easier.
The technique behind the cartwheel is pretty much the same as a flat spin, except that you want to rotate on a vertical plane. So for flat water cartwheels, key elements are torso rotation, good edge control, commitment and not being worried about falling over.
Torso rotation: To get your torso in the game, sit on flat water and plant your blade; it doesn’t matter which side, you can start with the side you are most comfortable with - if you’re right handed, start on your right side. Put your blade into the water about a blade’s length out to the side of the kayak and a little in front of your hips, as for a forward stroke, and edge your kayak as much as you can towards the active blade in the water. The trick here is to get your torso muscles to do the work. So imagine that you want to use those muscles to pull your bow into the water and then push your bow out the water, with your paddle there for support. Try to pull your legs towards the blade that’s in the water and when you feel that your bow doesn’t want to go any deeper, push your legs away from the blade you are using. Keep doing this and you should be able to rock your kayak; bow in, bow out.
Good edge control and commitment: At this point, it’s important that you are willing to fall over because if you don’t get your kayak on edge, you won’t be able to get your bow in and out properly, regardless of whether you are on flat water or in a hole. Too little edge and you will forever be doing flat spins. The more you practise, the easier it becomes to get it on edge and keep it there. This bow in, bow out exercise is called the ‘double pump’, and if you get the hang of this, you will be cartwheeling wherever and whenever you want!
A double pump is not only used on flat water, but also in river features to initiate your cartwheels. So to take the step from a double pump to your first actual cartwheel, you need to get some forward speed going. On your next stroke, put your blade in as far forward as possible and then pull it towards your hips. When the paddle gets to your double pump spot, lift the bow as high out of the water as possible, keep your blade there and smash your bow back down into the water using all your power (shoulders and torso people), to get your bow all the way under you. When you are vertical, look over your leading shoulder - if your right hand is in the water, you now quickly look over your left shoulder - and swing your paddle around so that your left blade enters the water with a powerful, vertical stroke, which will result in your stern smashing into the water. Congrats, you’ve just performed your first cartwheel. If you battle to get vertical, then try and do this exercise on an eddie fence, as it will make getting your bow or stern into the water easier.
Unfortunately I can’t take up all the space in this issue otherwise there won’t be room for all the other awesome articles. So grab your tech gadget, visit DO IT NOW’s website and look up my blog, which has loads more information on how to get your cartwheels linked and split them up, as well as start to clean and super clean cartwheels.
Next month it’s time to get some air, so I will move onto the loop, and for our river runners, the amazing hidden survival skill of the brace and its variations.
Issue:
Issue 23 Mar '13
Contributor:
Deon Breytenbach
Related content
|
|
|
|
|
|
|
|
|
|


